Introduction


My name is Gabriel Meytanis (candidate number 8560). I completed Brief 1:Music Industry, working in Group 2 with Georgina Harper-Dennett (8720) and Phoebe Hung (8017). Our group photo can be seen on the right of the page. To access my portfolio evidence, please click on the labels to the right named A2 Research and Planning, A2 Construction and A2 Evaluation.


GiGi - Sit Still, Look Pretty (Group 2 Music Video)

Digipak

Digipak
The inside and outside panels of our Digipak
Please click the image above to access our website

Sunday 27 March 2016

Evaluation Q1: In what ways does your media product use, develop or challenge forms and conventions of real media products?

Our film, 'Follow' details the story of main antagonist Grace: a teenage girl revealed to be obsessively stalking another girl, Ella, due to her jealous desire for popularity. This obsession becomes dangerously aggressive as the audience discovers that Ella is in a relationship with Grace's ex-boyfriend, resulting in Grace unsuccessfully attempting to murder her victim before escaping elsewhere, presumably to stalk another victim.

Throughout the opening sequence to our film, we followed and developed as many conventional features of psychological thriller films as possible, as well as following examples from the horror genre and other British productions. In order to achieve this, we ensured that we referred closely to form and style, genre codes and narrative structure – as well as to various media theories such as Todorov's equilibrium theory, Propp's archetypes and Barthes' narrative codes.

Form:
We felt that we largely followed the conventional format of similar opening sequences to psychological thriller films...

Characterisation:
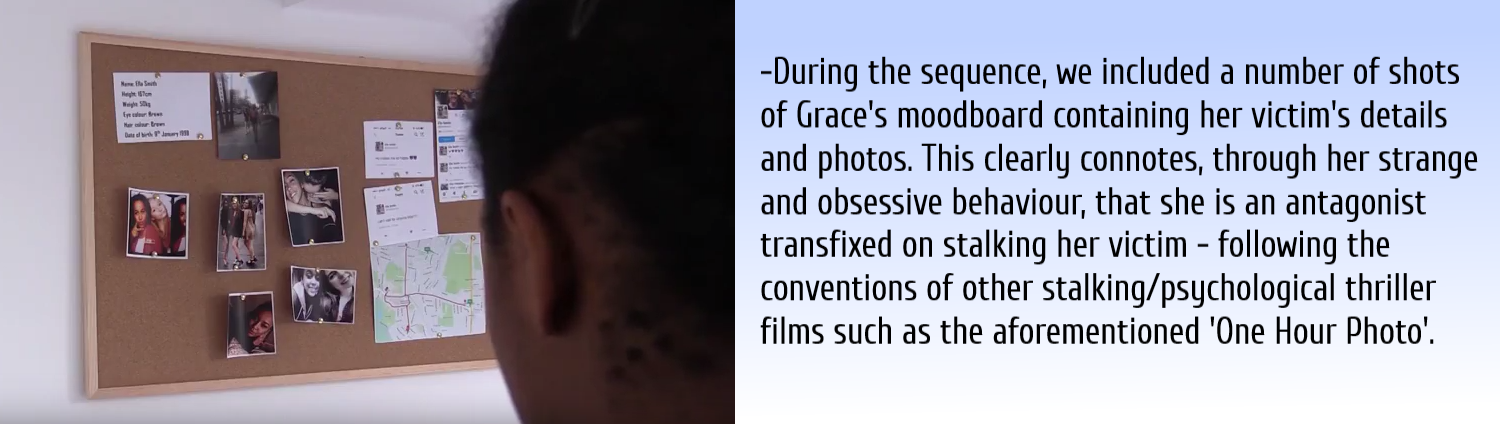
A main reference point throughout the project was 'One Hour Photo', and in particular the characterisation of main antagonist Sy Parrish as a conventional villain in a film of a similar genre to ours. Immediately represented as a disturbed, unnerving character via the opening scene in a police interview, within 'One Hour Photo' the audience is presented with many tense or potentially problematic situations where the character's truth may be uncovered. 
A central inspiration for characterisation was the character Sy Parrish from One Hour Photo.

Throughout our own opening sequence, we followed this convention, including a number of shots revealing a typically unstable and unnerving character...


Music:
We ensured that our music would be conventional in that it would be an integral part of the sequence to instill a sense of suspense and tension. Similar soundtracks in other psychological thrillers, 'The Machinist' and 'Kill List' use sudden crescendos to good effect to create tension and we felt that our track, 'Saw the Devil' achieved similar. 


Grading:
Admittedly, we didn't have as many grading references as other aspects of our opening sequence. However, we kept in mind a strong idea that we wanted to use cool tones of a blueish hue to create a cold mood - especially with the highlights prevalent throughout our sequence. We also wanted to reduce our shots' saturation using ProcAmp in order to achieve this look - a similar aesthetic found throughout 'The Machinist'. 
 
These particular choices of:
-pulsating, heightening music to create tension
-increasing pace throughout in both cuts and actress' actions
-cutting shots to the music/conclusion with music
-using cold, low-key colours for aesthetic and a digital font to clearly connote the social media USP
reflects deliberate choices in style to help our film appear like a conventional psychological thriller film.

Use of relevant media theory:
Please access the Prezi below to see our film's use of media theories...


Evaluation Q2: How does your media product represent particular social groups?

Although our opening sequence featured only 3 characters (with 2 briefly seen) and so maybe slightly restricted our choices of representation, we still had to make important decisions as to how to represent them so as not to alienate or exclude the core target audience of 15-24 year olds - particularly when representing age and gender

When choosing to represent the particular social group of college-aged females, although it was a group we felt confident in representing, we also thought it would be very interesting to reverse conventions of how they are typically portrayed - as well as including an antagonist as the main character.

By using Ella and Grace - two teenage girls in differing roles in our sequence, we were able to both conform to typical stereotypes of how characters like them are represented in real media productions as well as challenging them through our choices of:
-costume & makeup
-dialogue
-action/behaviour
-setting, mise-en-scene & props

Please access our main representation of social groups below (please click fullscreen for full analysis)...
Powered by emaze

Evaluation Q3: What kind of media institution might distribute your media product and why?

Due to the independent nature of our film, and its low budget requirements, our film is most likely to be distributed by an independent British media institution. This is because such companies are well-equipped and used to producing films which (as they are independent as opposed to a mass-produced Hollywood storyline) are more tailored to suit critics and niche audiences. For the reasons mentioned, our group decided on Film 4 - a well-known distributor of British indie films - to distribute our film.

Our production company:
Please see our choices regarding our production company using the Prezi below:


Our distribution company:
Similarly, please see our choices regarding our distribution company using the Prezi below:


Marketing Strategy:
With marketing, we took inspiration from the campaign for 'Unfriended' - another low-budget film using technology, as they utilised online campaigns which are not only cost-effective but are able to spread awareness of the film quickly via word-of-mouth or by further sharing the film & its information. This would be a particularly attractive option, as the vast majority of the core target audience of 15-24 year olds use social media in their daily routines. Additionally, the social media USP of our film would also be represented using this method.
We found that the marketing campaign for 'Unfriended' was a useful reference


Distribution:
Comparison between our possible release plan and that of fellow British
independent thriller Kill List.
Cinema exhibition:
As it is a smaller independent film and doesn't guarantee ticket sales, screenings at large cinemas such as Cineworld, Vue and Odeon are likely, but perhaps only on a limited basis. It is more probable that the film will be shown at smaller independent cinemas such as Everyman and Phoenix. The release in both types of cinema could also help our film target the additional tertiary audience of general cinema-goers

TV exhibition:
As Film4 are our distribution company, it is likely that they will show our film on their TV channel, as this not only helps provide the channel with content but helps to publicise their film. Alternatively, other channels could buy the rights to show the film.

Online release:
The film could potentially be available on streaming sites such as Netflix or Amazon Instant Video, depending on commercial or critical success. Although this is not certain - especially for small thrillers such as Kill List, which not only was available on Netflix 2 years after its release, but is only available in certain countries (not including the UK).
Meanwhile, independent films are often subject to illegal streaming via sites including Putlocker & The Pirate Bay. Although this could harm the film's commercial success, as it is viewed for free, it could potentially increase the film's awareness - useful when critical success is often prioritised over profits with independent films.

DVD release:
It is likely that the film will be released on DVD and Blu-Ray several months after cinema release (Kill List's home video release date was 26th December 2011 - almost 4 months after its release date on September 2nd 2011). It will be sold both online via sites like Amazon, and in stores including supermarkets and entertainment stores, as this will enhance the reception and potential income of the film. 

Evaluation Q4: Who would be the audience for your media product?

We had various target audiences in mind when producing our film - predominantly the 15-24 year-old audience, as not only would we have more confidence when tailoring the film to them, but this group also makes up the largest portion of cinema-goers at 30.8%.

I have produced a Prezi (please click fullscreen for clear analysis) with full information on our various target audiences and how we targeted them...

Evaluation Q5: How did you attract/address your audience?

Using the uses and gratifications theory:
Through our knowledge of the uses and gratifications theory, we were able to successfully appeal to and entice our target audiences. As the theory states that consumers of the media are active, and will choose media which satisfies their needs, we were able to tailor our film opening to suit these particular needs for:
-entertainment & escapism
-information
-personal identity
-social interaction

Below is a mind-map of how we used this theory to address the audience...
(please use the mouse to navigate, + to zoom in and - to zoom out)


Use of conventions & audience expectations:
As well as the uses and gratifications theory, we also directly targeted our niche audience of psychological thriller fans using conventional characters, shots and action, as well as genre codes in order to maintain plausibility and meet the expectations of this audience. For example:

-The use of props (moodboard, camera, gloves, etc.) - in particular the knife - created a sense of unease and clearly indicated the thriller genre & darker elements within the storyline.
-Our use of framing for effect within the sequence: low-angle shots create a sense of power around the antagonist, whilst OTS shots and eyeline matches add perspective and immerses the viewer in the story.
-Use of pulsing music and cold grading are also commonly found in psychological thriller films.
An example of Grace's aggression
-Moreover, our use of continuity techniques (match-on action, eyeline matches, etc.) increased the realism our film was able to convey.

Meanwhile, we also used Barthes' enigma theory throughout (see Evaluation Q1), leaving questions from the audience unanswered to keep the viewer interested and watching to have these questions answered.

Audience feedback:
Throughout the project - especially during the production stage, we collected crucial feedback from a sample group of 8 people from our main target audience between 15 & 24 in order to track whether our vision was being translated into a decent finished article. To ensure the data was fair, the genders were mixed and the ages of the group varied. This feedback was of course extremely important and benefited us hugely, as it offered an insight into our work from the viewer's point of view. 

We conducted large-scale feedback after:
-the rough cut
-the final edit

Below are the results of the feedback after the rough edit:
Rough edit feedback results
The initial comments after the test shoot were, admittedly, pretty abysmal:
-The setting was too tight & this limited shot variation.
-The characterisation was poor: unclear who the characters were: we didn't use our main actress & didn't have any nailed-down hair/make-up & costume decisions
-The storyline & plot were completely lost, with weird sounds (e.g heavy breathing) confusing the audience.

However, in hindsight these comments were pivotal in helping us edit our storyline and in turning our project around - as is evident from the contrast in feedback between the initial rough cut and the final production. I also conducted some extra individual reactions from the audience which you can access by clicking the sheets & video below...
Final edit feedback results
(please click to enlarge)
Further audience feedback which I conducted after the final outcome


Audience feedback video

Evaluation Q6: What have you learnt about technologies from the process of constructing this product?

I feel that I was able to learn a lot and gain many technological skills during the course of the project. I was able to utilise as much of the equipment at hand (both hardware and software) as possible, learning new techniques & correct procedure at all 3 stages, and consolidating previous knowledge from past work. In my opinion, we worked very well with technology as a group and, though there are still some possible improvements, our capabilities allowed us to create our final production to a high standard.

Hardware:


Software:


Technologies used at each stage:
Prelim & pre-production:
-Camera, tripod, headphones, shotgun mic, dual-monitor Windows PC
-Adobe Premiere Pro, internet

The Prelim was useful, as it provided a chance to recap and refresh previous practical skills before we embarked on the project itself. We used the same shooting and editing equipment as the main shoot, and I was able not only to consolidate shooting skills, but combine them with thinking about continuity laws (such as the 180° and 30° rules) for the first time.
During pre-production, though it wasn't specifically shooting or editing, I realised the importance and required quantity of research needed when preparing to create a new film or media product in general.


Production:
-Camera, tripod, headphones, shotgun mic
During production, we were able to put these skills to good use. The main improvement I was able to take away from this stage was to pans and handheld shots, which I was able to perform during the main & back-up shoot sessions.

Post-production:
-Dual-monitor Windows PC, Apple iMac, Blue Yeti mic
-Adobe Premiere Pro, LiveType, Audacity

During post-production, I was once again able to not just recap previous learning, but build on this foundation. In particular, I found learning about tools including the Pen Tool and keyframes very useful, as these were two important aspects which I had't been used to working with.

Please access below our use of software and hardware throughout the project:


Overall, I felt pretty confident when using hardware & software: both those which I had previously experienced, as well as technology which I hadn't been exposed to yet. In hindsight I would say that this was perhaps one of my biggest technological challenges personally, as I was stretched to become used to working with these tools, such as the Pen Tool and keypoints when using the Adobe Premiere Pro editing software.

Evaluation Q7: Looking back at your preliminary task, what do you feel you have learnt in the progression from it to the full product?

Whilst, of course, we wanted to create an entertaining opening sequence to a film, and were eager to produce our ideas on camera as soon as possible, we also understood from previous tasks - especially the preliminary task - that we had to adhere to a set brief:
The brief assigned to us for the preliminary task.
The brief assigned to us for the production task.
Our completed continuity prelim task

As mentioned, we took away valuable knowledge of continuity from the prelim, which we carried forward into the main production task:

shot / reaction shot in our prelim
match-on action in our prelim
eyeline match in our prelim
180-degree rule in our prelim


shot / reaction shot in our sequence
match-on action in our sequence


eyeline match in our sequence

180-degree rule in our sequence


Below is a presentation on how we applied the knowledge taken from the preliminary task as we progressed towards the finished article...

Construction Post 10: Looking back - reflections on our final outcome

In the end, I am absolutely delighted with the final outcome of our opening sequence. All things considered, with the seemingly huge task of re-writing a huge amount of the storyline and re-planning location, documents and props, I feel it was a massive success and testament to the good organisation and hard work we put into completing the project to both time and standard.

Our original brief
Taking the brief into account, I feel that we met every aspect specified (besides the length which admittedly is a little longer than usual). For instance, our video and audio were both original ideas produced by our group and tailored around feedback from the 15-24 year old target audience, and our primary & secondary target audiences were clearly indicated through the storyline, characterisation & representation of our sequence. 

If I were to re-do the sequence, I would perhaps leave more time to focus on its grading and aesthetics. Although colour was generally good, I thought that some shots were still a little different colour-wise, and I'd also had a very general idea of how I wanted the sequence's grading to appear rather than a specific concept which maybe could have been worked on with a few more references. Additionally, we included some adventurous shots, such as a POV from the window and inside the bag, though maybe we could have included one more - especially as we had to cancel a "CCTV-type" extreme long-shot as it wasn't practical. Overall, though, I'm more than happy with the finished product, and I hope that you feel the same way.

Please click this caption to link to an interactive version of the timeline above


Construction Post 9: My technical learning curve

The project enabled me to expand on
various technical skills, both when
editing and shooting.
Throughout the project, I made sure that I picked up on various processes and tools in order to develop my technical skills. In all 3 stages of pre-production, production and post-production, I felt that I honed these skills well, and that I was able to use the project as an opportunity to gain useful experience and knowledge.

Although previous projects and media assignments at GCSE and preliminary level had introduced me to the basics of shooting and editing, there were of course other skills which I was able to learn during the course of the project. For instance, during editing I hadn't previously used tools such as the pen tool, in order to adjust a section of a shot's audio to eliminate background noise. Another example of a previously-unused tool was the use of keyframes to edit the position of a shot on-screen (such as the sliding shots in the opening scene).

In terms of shooting, I learnt the significance of lighting when taking shots. Not only did our group have to pay close attention to the weather and lighting when shooting in order to get the aesthetic and conditions which we wanted, but also during the shoot, as one of the shots lost focus mid-way through recording and needed to be re-shot.

I believe that, having taken these processes and tools into account, I learned a great deal of new technical skills as well as recapping other areas of production and editing.

Construction Post 8: My personal contribution to the edit sessions

Me editing our sequence
As with any part of the process, I put in as much time and effort as possible when editing. I gave up a huge amount of free time both during and after school, often working at lunchtimes & until 17:45 to make sure the project was completed before the deadline, and to a high standard. 

I thought that me and Josh edited the sequence well, and edited our version of the opening sequence with confidence, taken as a result of previous experience with Premiere Pro for other projects & media work. Personally, I helped to cut out a lot of background noise from rushes, chose a grading style with blue tones for cold, moody cinematography, and also was responsible for mixing the music to conclude in time with our sequence.

I felt that one positive of editing with Josh was that we both paid meticulous attention to continuity, although in hindsight we maybe spent a little too much time examining small details. Moreover, if I were to change anything about our editing sessions, I would maybe divert more time into grading and lighting rather than concerns over shots being a frame too long, as there were still some colour differences between shots which were not resolved. Overall, though, editing went very successfully in my opinion.

Construction Post 7: My personal contribution to the shoot sessions

Me operating the camera
during a shoot session.
Personally, I believe that I contributed a great deal to all of our shoot sessions (except the test shoot, which I was absent for). With both the main and test shoot sessions, I ensured that I took as much responsibility as possible: for instance the location for all the shots was my house, which meant that I had to prepare and dress the set before both shoot sessions. It was also my job to safely and punctually transport the kit from the media department at school to my home, and ensure that it was quickly set up before we began shooting.

During the shoot sessions, I also made sure I played an active role. One aspect of shooting which I felt we performed well was ensuring that as a group we divided each duty equally, such as:
-shooting
-directing/clapperboard
-sound check


We ensured we all had a level of responsibility
If I were to improve the shoot sessions in any way, I would maybe have kept a log of how many shots we took in each role to ensure the utmost fairness - although overall I felt it ran very well and that I made a significant contribution.

Construction Post 6: Reflections on Edit Week 2

We added our LiveType titles in the
second editing week, choosing a font
which connoted technology & social media
Having split into smaller, more focused groups and completed a lot of the fundamental work dragging and cutting most of our shots, we allowed ourselves to work productively but without the same pressure as the first week. I felt this was important, as this allowed us enough time to focus on putting the finishing touches to our sequence rather than catching up on important work. 

(left) before grading vs
(right) after grading
Josh and myself had a list of tasks which we had left ourselves which was kept in our group folder. Although we were already aware of what we needed to do, and the paper often went missing amongst other documents, we felt it was handy to remind ourselves of exactly which areas of the sequence we needed to work on.
During the second week of editing we:
-Updated the sequence with new & re-taken shots
-Adjusted the new shots to fit accordingly to the music
-Added our new titles created on LiveType
-Graded our shots using ProcAmp & the 3-way colour corrector
We used tools such as ProcAmp
and the 3-way colour corrector
when grading
-Made improvements to aspects such as grading based on target audience feedback

Looking back, I feel that the second editing week went very successfully. Despite the group having separated, and Josh & myself perhaps spending a little too much time on cutting to within a frame's accuracy, it eventually ran very smoothly due to our hard work and good organisation in both weeks.

Construction Post 5: The back-up shoot

Due to a couple of shots needing to be re-taken, we went ahead organising a back-up shoot. We referred back to our sequence up until that point, plus any new shot ideas and produced a back-up shoot list, as well as publishing our sequence's progress to YouTube - we found this very useful not only to detail progress up until that point, but also as a reference tool, as we could view how the set was dressed, where the actress stood and other technicalities when we were preparing to shoot.
Some examples of why we had to re-shoot

In the end, the back-up shoot went well. Although initially it started poorly - we couldn't find the bag containing our actress' clothing and wasted time finding it, and didn't replace any of the moodboard photos for the re-shoot - it eventually ran smoothly and just on time. I thought our shots were accurate and well-planned, as we took multiple takes of each scene to ensure we selected the best one when editing, and glanced back at the main shoot video for accuracy. We were maybe a little too meticulous, as we just finished before our planned wrap time. 

Having experienced problems with the back-up shoot, I would definitely put even more care into listing and organising every detail, as we were perhaps a little more casual in preparing for a shorter shoot. This would then ease with the shooting process, as we had to alter certain shot plans midway through the back-up shoot as they wouldn't work without certain props. 

Construction Post 4: Reflections on Edit Week 1

As a group, we were well aware that post-production would require us to put as much time and effort in as possible to ensure that editing was completed to time and was of a good quality. To ensure that everyone put in this required work, we drew up an editing schedule during a group meeting to organise the days on which people could come in and work. Group members' initials were marked against a particular time and day, with the aim of having at least 2 people working on editing so as to ensure efficient work rather than leaving one person to carry the burden of the entire group's responsibilities. Upon reflection, I felt this was a great system, as it indicated how much free time we were willing to give up as a group in order to guarantee the completion of our project, as well as making sure that people turned up and did their specified duty.

One of our tasks this week was to update
our music, which initially didn't connote the
 unease and fear that we had initially hoped for.
In hindsight, though, there was a slight blip this week, as the group were at odds and had different ideas as to how to present or edit certain scenes. This affected our productivity and, after consulting our teacher, decided to edit in 2 separate groups of Josh & myself, and Ella & Pru. Looking back, this was eventually a great decision to make, as although we were no longer a four, we still discussed important decisions & organisation (such as improvements on audience feedback) and had group meetings with each other. This ensured that we made steady progress both as smaller groups and as a collective.

(please click to enlarge)
We produced a re-shoot list this week
to indicate which shots needed re-doing.
One such group task was to decide upon which shots we wanted to re-shoot after editing the rushes from the main shoot. We then drew up a re-shoot list similar to the shot list for the main shoot, as in our opinion this was the quickest and easiest way to ensure that we accurately referred back to the relevant shots on the day of the back-up shoot.


Below, I have produced annotations describing our progress during the first week of editing.
In order to access them, please press the subtitles/CC icon and select English(United Kingdom)


Construction Post 3: Reflections on our main shoot session

There were a few errors which we could
easily correct - such as this shot, which
lost focus as the light changed.
I felt that our main shoot went very successfully - especially when compared to the test shoot. We had admittedly left ourselves with a massive amount to work on after the test shoot and needed to film in a new location with our main actress for the first time, as the target audience feedback group were not keen on the original setup at all. Nonetheless, we completed all of the shots to a high standard and with time in hand, with the other group members expressing that there were far fewer problems compared to the test run. For instance, the location offered more natural light which was much easier to control using the blinds, thus avoiding the same continuity errors with lighting as the test shoot. The location was also much larger to shoot in, which meant that pans or tracks were easier to perform. As a result, the vast majority of our main shots were used in the final sequence.

We also wanted to correct small details
 to improve the storyline. We felt, for
instance, that we could have added a
little more aggression to this shot.
On the other hand, there were still small areas and shots which we wanted to improve, plus a few noticeable errors such as:
-the separate pans when Grace walked around the bed were a little jumpy
-some shots, like those filmed on the bed, were shaky as there was little camera support
-the shot of Grace preparing to leave lost focus as the light behind changed suddenly
-Grace's shoes are clearly put on in this sequence, yet in the next shot she exits wearing only socks

Luckily, though, these were extremely minor compared to the problems of re-organising & re-planning a great deal of our entire project, and were easily able to be corrected. Overall, despite these small improvements for the back-up shoot, I was really pleased with how smoothly the shoot ran, as we worked efficiently and ensured that the takes were good enough.


(left) An obvious continuity error                      (right) Our main edit (without back-up shots)

Construction Post 2: Our post-production kit

An example of our editing space
Our post-production kit list:
-Dual-monitor Windows PC:
enabled us to separately edit & view our sequence
-Adobe Premiere Pro:
software used to edit the project
-Apple iMac
-LiveType:
(on iMac) for animated titles
-Blue Yeti Microphone:
to record extra dialogue
-Audacity:
to save recorded dialogue to the PC

During the post-production stage, each group was assigned an edit suite at which we would edit our rushes, titles, graphics and music into our sequence. These edit suites were equipped with the hardware & software listed above, however we used the microphone and Audacity in a separate quiet room so as to record Grace's friend's dialogue without background noise. This sound then had an EQ audio effect applied and its frequency adjusted in Premiere Pro, to make it seem like in-call dialogue.
Please access my analysis of the Premiere Pro workspace via the Prezi below (click fullscreen for clear analysis)...

Construction Post 1: Our production kit

(please click to enlarge)
We signed a shoot organisation form to
confirm timings & to give us the
necessary permission to shoot.
Our kit list:
-Canon Legria HF G30 camera:
to shoot our sequence
-Tripod:
to support the camera & provide stability when shooting
-Sennheiser HD201 Headphones:
to check that sound is being recorded properly, and to check for background noise
-Shotgun mic:
to record sound
-Clapperboard:
to detail the shot & take of rushes for ease when editing
-(plus shootboard/clipboard for reference)

The media department at school allowed us to use their provided kit in order to shoot our media film sequence - this was extremely useful as it prevented possible transport, hassle & costs of hiring or borrowing equipment. We were permitted to do so on the basis that we not only confirmed and signed our shoot days onto an authorisation form with our media teacher, but also that we had signed an equipment release form and completed basic camera training such as how to properly pack a kit bag or safely change a battery.

Once this was completed, we were allowed to shoot. It was my responsibility on the main and backup shoot weekends to ensure that I had signed for and collected the kit on the Friday beforehand, and that I had safely transported it from the shoot location back to school before school began at 8:35 the following Monday. In my opinion, this contract was helpful in ensuring that I understood my responsibility and that I needed to be punctual and sensible when transporting and working with kit.

We had to sign an equipment release form to
confirm we were trained and able to use
and transport kit safely. This then gave us
the required permission to shoot.